I have become very sensitive to the world of celiac disease and gluten-free diets due to a recent diagnosis of someone close to me. I was lucky enough to find this recipe and am happy to share it with you. Of course, if you are not gluten free, you can certainly enjoy them as well.
Gluten-Free Crispy “Hamentashen” Treats
Ingredients:
- 1 cup sugar
- 1 cup corn syrup
- 1 cup peanut butter
- 5 cups Rice Krispies
- 1 cup chocolate chips
Procedure:
Melt the corn syrup and sugar in a saucepan on top of the stove over a low flame. Take the pot off the flame and add the peanut butter. Pour the Rice Krispies in and mix them until they are full coated in the mixture. Spread this mixture out onto a cookie sheet with a lip (which I call a jelly-roll pan). Let cool. Spray the pan with Pam to assure ease later on. Let cool. Cut into triangles. If you choose, you can use a triangular cookie cutter for easy and uniform pieces.
Melt the chocolate chips in the microwave or on top of a double boiler. Spread a little chocolate on top of each triangle. Enjoy.
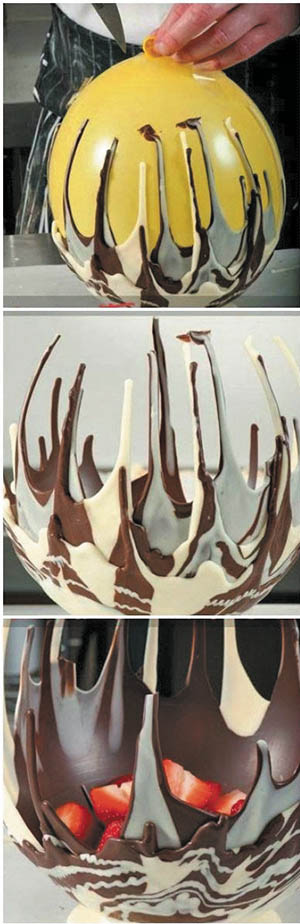
Balloon Bowls…Perfect for Purim or Any Time
I grew up in Cleveland, Ohio where they have this amazing chocolate store where their trademark is Balloon Bowls. They are used for all kinds of simchas and look simply spectacular. I found a recipe that pretty much replicates the ones they make. It’s great not only for your Purim table as a centerpiece but can be used for any occasion. You can fill them with Hamentashen or just about anything you wish.
You will need:
- 1 very large balloon
- thick clear tape
- 1 medium-sized bowl
- 7.5 ounces dark chocolate (can use milk if you prefer)
- 7.5 ounces of white chocolate
- parchment paper
- a sharp knife
In two separate bowls, melt the two kinds of chocolate either in a microwave, regular oven at 200 degrees or over a pan of boiling water. Make sure that the bottom of the bowl does not touch the water if using this method. Once the chocolate has melted, leave it to cool until it is around body temperature (not too hot). You must cool the chocolate or the balloon will pop if it’s too hot. Blow up your balloon and tie the end. Take a small piece of heavy tape and place it just to the side of the knot of the balloon. This will ensure that the balloon stays in one place when you later deflate it. Place the knotted end of the balloon inside the bowl and secure it in place with more tape. Pour a quarter to a third of the dark chocolate onto the balloon followed by a quarter of the white. Leave the chocolate to set either in a cool pace or in the refrigerator if you want to speed things up. It is ready when the surface is solid enough to touch and is no longer shiny. Continue to layer the chocolate on the balloon allowing it to set between applications until you have used all the chocolate. Save about a quarter of the white chocolate to make the base of the bowl.
Pour on the final bit of white chocolate and then immediately flip the balloon over onto a piece of parchment paper. Hold the bowl or balloon until the chocolate has set enough for you to take your hands away without the balloon moving. Then leave it to set for a couple more minutes. Undo the tape that is attached to the bowl and then lift off the bowl. Hold the knotted end of the balloon and pierce it with a sharp knife in the center of the piece of tape you first attached. Pull gently on the knotted part of the balloon to help the air out. Once the majority of the air has been released, you should be able to remove the balloon with ease. Your balloon bowl should be ready to fill.
By Gail Hochman