
I plan to occasionally suggest small tasks that will get Jewish Link readers interested in doing a bit of carpentry. I never grew up doing this sort of handy work, but over the years I managed to ease myself into small and ever-larger tasks, leading up to such things as an outdoor poolside deck, a couple of tool sheds, framing and finishing basement rooms and more. The real trick is to work your way up gradually, one project at a time, finding fairly simple projects to start with. I believe anyone can do it.
If you decide to start some carpentry, don’t rush out to buy a full suite of tools. Buy only what you will need for each project—but try to buy good quality items. For this project, you might not even need any tools at all.
Nowadays, many kitchens have granite or other surfaces that can be kashered using boiling water. But if you have linoleum, tile or wood countertops, the boiling water method won’t do. I’ve tried various ways to cover counters over the years, such as using inexpensive drop cloths held in place with layers of duct tape, or thick plastic sheets that resemble corrugated cardboard and are easily cut to shape. They always leave a mess after the holiday. And I don’t like the idea of buying new materials each year.
My recommendation is to try this simple weekend project making lightweight plywood countertop boards that will hold up for decades. Installing them each year is a breeze—just drop them in place, and tape the edges using wide blue painter’s tape. It will hold the boards in place, prevent leaks, and is easy to remove when Pesach is over.
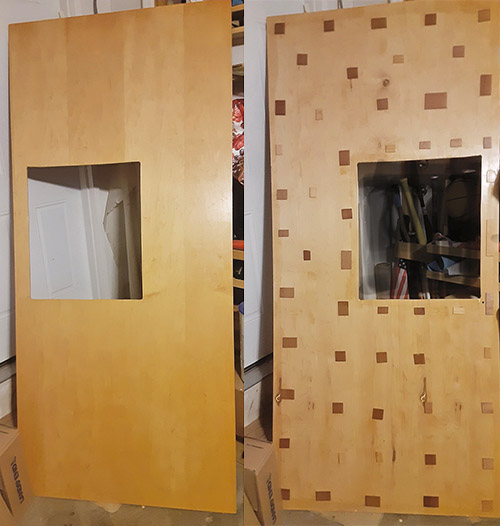
The two photos show the top and bottom of a board I made several years ago to cover an island countertop with a sink. The little squares pasted all over the bottom are scraps of wood that keep the board elevated, in case any water gets trapped underneath.
Lowes sells ¼” thick plywood sheets, 4×8 feet in size, with one surface a beautiful smooth maple. That is what I used. (You can choose a less expensive plywood, or try Home Depot, or your local hardware store.) Smaller panels, called “project panels” may also work for you, but they are not always in stock. Any of those big box stores will cut sheets to your specification—but they will only make straight line cuts, nothing fancy. Unless you are quite comfortable and experienced with carpentry, I would not suggest that you try to cut these boards yourself. On a table saw, it is very awkward manipulating a 4×8 foot board. A hand held rotary saw can work, but only if you know you can make a straight cut. Sawing by handsaw will be exhausting and will result in a wavering cut. Best to let the store cut it for you!
The trick is to figure out how to divide your countertops. If you have an L shaped area, plan on covering it using two boards and taping them together at the seam (unless you want to bother cutting the L-shaped piece of plywood yourself, and storing that awkwardly shaped piece from year to year.) Once you know how you will divide your countertops, measure extremely carefully. The store will cut your boards to within ⅛”. If one or several boards run from wall to wall, try to err about ⅛” or ¼” on the small side, to be sure they will fit.
To prevent small amounts of water building up under the counter, cut small pieces of ¼” thick wood from excess scraps, using a handsaw, and glue them to the underside of your boards every foot or two. Use either a good “wood glue,” such as Gorilla Glue, or construction adhesive.
Use a medium weight sandpaper, like 120-grit, to smooth down all the cut edges. Or you can use a coarser grit first, and a finer grit like 220 to smooth it finely. I would sand by hand, but if you wish to splurge on an electric sander, I would suggest a palm sander that accepts rectangular pieces of sandpaper. You should not need to sand the flat surface of the board if your plywood has been pre-sanded.
Finish your boards on both sides with an oil-based polyurethane, such as by Minwax. (I don’t find water-based polyurethanes to be as good, although they make it easier to clean your brushes afterwards.) You will want to apply at least two coats, possibly three, with drying time between coats, so plan ahead for several days of drying. I apply the polyurethane using an inexpensive “chip brush” (not the foam rubber type), and between coats I save the brush in a plastic bag to prevent it drying out. When the project is complete, throw out the brush. If you use an expensive brush, buy paint thinner to clean it.
You will want to polyurethane the boards in a well ventilated area, such as a garage or on a back porch. Lay down newspapers—no matter how careful you think you are, there will be splatter on the ground that makes permanent marks. Plan ahead how you will let the boards dry. That may mean finishing one side of a board at a time and resting them for a day on a cardboard box, or perhaps carefully leaning boards against a wall protected by a scrap board.
As you can see from the photos, which show the top and bottom of my 3×7 foot board, I cut a space for a sink. To do this, cut the outline a little larger than the sink. Use a large drill bit, say 1”, to make four rounded holes at the corners, and cut with a small “keyhole” saw to connect them.
You might consider buying a proper drill. I rely very heavily on a “Milwaukee” brand “impact” drill bit for nearly every task I do. Impact drills require specially designed drill bits, so be sure you only buy impact drill bits. Otherwise, a regular drill and regular 1” drill bit will work just fine. You might also like an electric jigsaw or reciprocating saw to make the straight cuts quickly, instead of the keyhole saw.
The boards do not have to precisely fit the countertop. The tape can cover a slight size difference between the counter and the board. Be sure to use a nice wide roll (2” or more) of “blue painter’s tape” rather than duct tape painter’s tape will hold everything securely, and will be far easier to remove after Pesach than duct tape.
Once you have made these boards, it might take no more than a few minutes to put them in place and tape them up, and even less time to disassemble them after the holiday. If your counters include a sink, be sure to kasher the (metal) sink before you put down the boards and tape them in place. A zissen Pesach to all.
By Dan Dyckman