
We begin the main part of the Seder with “Ha Lachma Anya,” where we hold up the matzah and declare, “This is the bread of affliction that our forefathers ate in Egypt.” But is it? I would argue that our experience of matzah has deviated so far from its purpose as to represent the opposite. I will then suggest how we can get back to experiencing the original meaning of matzah.
Matzah is the bread of affliction because it is what we ate as slaves. In ancient Egypt, bread was a luxury enjoyed by royalty, and was the high technology of the time. The time needed to allow dough to rise and not spoil was not available to everyone, and certainly not slaves. Consider that they were not buying yeast from the supermarket, and ask anyone who has made sourdough how much time and effort goes into the process.
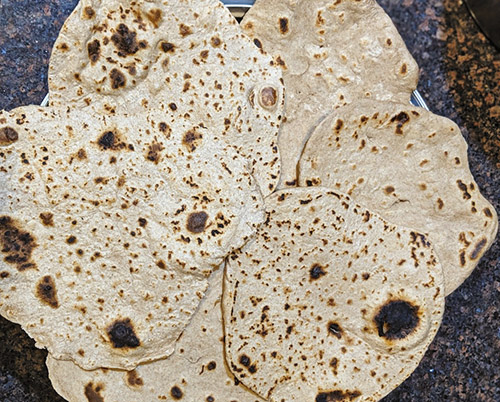
By contrast, slaves did not have the luxury of time. Mixing some flour and water together and quickly baking into a flatbread was the best they could do. Many cultures have a simple flatbread that was a staple of the common folk—chapatis in India, tortillas in Mexico, etc. By getting rid of our leavened bread and returning to simple matzah, we re-experience what it was like to be slaves.
However, as we go out to buy our matzah for the Seder, we may notice something is amiss. Shmura matzah for the Seder generally costs $20-$30 per pound, whereas challah costs only a few dollars. The meat you bought for the Seder probably costs less per pound than the matzah. Is this really the bread of slaves? This is not just a complaint about the costs of keeping kosher; it’s a fundamental flaw in the purpose of matzah. I would argue that matzah that costs more than bread should not qualify as lechem oni.
Furthermore, many of you have probably baked challah, and this is pretty straightforward and achievable if you wanted to do it. But how many people have baked matzah? Most people will tell you that the process is so complex, that it can only be done in specialized factories by highly trained individuals. Those factories have been working for months to produce the matzah for everyone’s Seder.
So, we now have a situation where the average person can bake bread, but not matzah, and where the poor man’s bread costs many multiples what the rich man’s bread costs. Does this make any sense?
It is time to reclaim the mitzvah of matzah and return to the age-old practice of making our own matzah. The Shulchan Aruch states that the ideal is for every person to bake their own matzot (OC 460:2). I have been doing this for years, and it has deepened our connection and that of our children to this mitzvah. Space is short here, but I will share with you the basics of how to do this yourself.
First of all, you need to get some shmurah flour. Regular flour is not recommended since most commercial wheat is tempered, meaning they spray the kernels with water before grinding them into flour. A number of matzah bakeries will sell you flour. I’ve gotten in the past from Shatzer and Pupa-Tzeilim, but try calling any local matzah factory. Make sure to keep it dry! The crazy thing is that even though shmurah flour is a specialized product, it’s pretty cheap. The price varies by year, but this year I paid $2/lb for Shatzer flour, whereas they charge $31/lb for the finished product.
Next, you’ll need to decide where you are baking matzah. If you happen to have a pizza oven or outdoor brick oven, that’s great, but it’s not necessary. You can use your regular oven or stove-top. Of course, everything will need to be kashered for Pesach. For oven baking I have a pizza stone (dedicated for Pesach). Place it in the oven a half hour before baking and turn the oven up to the highest temperature. For stove top, which is now my preferred method, any non-stick pan will work, but I got something called a tawa, which is a flat pan used for making chapatis. This is lightweight and easy to flip, and they come out great!
The ingredients are really easy. Flour and water. Every flour is different so you will need to experiment to get the right ratio. I use a bit less than half a cup of water to one cup of flour. There is a custom to draw the water the evening before so it will be at room temperature for baking (OC 455:1). I’m not sure this is required, but I generally fill a pitcher of water before bedikat chametz and use that the next day when I bake. Regular tap or bottled water is fine.
Make sure you have a clean surface and some helpers. Start a timer for 18 minutes, or just check the clock if it’s Yom Tov. (Yes, you can bake on Yom Tov!) Mix your flour and water together and say “lesheim mitzvat matzah.” Knead it well. If it sticks to everything, you need more flour. If dry clumps are left in your bowl, you need more water. When you are ready, split the dough into however many parts you want, and roll them out. Make sure to keep the dough moving the whole time, so if you are waiting for equipment, keep kneading the dough in your hands. I have found empty wine bottles with the label removed to be the easiest to use and clean, but you can use regular rolling pins as well. I do not recommend using flour to dust your rolling surface; if you do, the minhag of gebrokts will make much more sense, since there will be flour on your matzah. That’s why you want to find just the right consistency for the dough.
Get it nice and thin. Holes may or may not be required, but will better ensure your matzah cooks through. Look online for a dough docker for an easy way to make the holes. This is also a great job for kids whom you may not trust with the rest of the process.
When the matzah is ready, toss it on the pan or stone. Depending on how hot the surface is, how thin the matzah is, and whether you want your matzah soft or hard, will all dictate how long to leave them baking. When I make soft matzah in a pan, I do about a minute on each side. When they’re done, place them on a rack without stacking them. Note: soft matza is a topic for another time, but there is a strong argument that this is originally how all matzah was made. And korech will make a lot more sense.
I bake matzah on Erev Pesach after chatzot, which is the ideal time for making Seder matzot (OC 458:1). I also bake during the week. Soft matza doesn’t stay fresh for long so you’ll want to keep making more. When baking after chatzot on Erev Pesach when one is no longer allowed to own chametz, make sure to finish all of your cleaning within the 18-minute time frame. Toss any crumbs down the garbage disposal, or put some soap on them and throw them in the garbage. Wipe down all the surfaces and utensils as well. The Shulchan Aruch also says to declare before you bake that any crumbs should be annulled (OC 460:3). Once the last matzah is baking, someone can start the cleanup. Once you’re done, you can start the clock again and do another round. When you get more comfortable, you can see how many matzot you can get done in 18 minutes.
I’ve run through the details pretty quickly and focused more on the practical aspects than the halachot. Please feel free to reach out to me with any questions you have. You can also ask your rabbi, but there’s a good chance he’s never baked matzah at home. You might want to read through the Shulchan Aruch (Orach Chaim 453-467) to get some more details, and also see how it was considered normal not that long ago for people to make their own matzah. It may seem daunting at first, but know that this is how it was done for generations, and still is in many places today. You can do it too. And saying “Ha Lachma Anya” will never feel the same again.
Ben Sandler lives in Teaneck with his wife and children. He can be reached at [email protected].