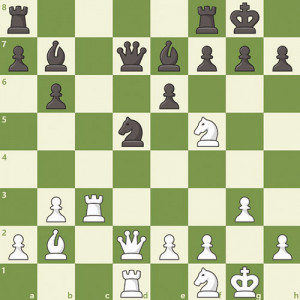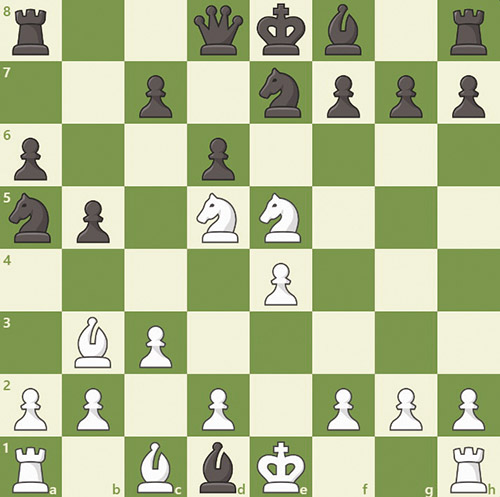
In chess, a clearance sacrifice is a tactical sacrifice of material to open up a square, diagonal or file, which can then be used to attack the opponent or win back material. The idea is demonstrated in Figure 1, a position from a game Johann Nepomuk Berger vs. Frohlich in 1888, in which white is down a queen but is able to checkmate black by force in two moves. To win the game, white begins with the move knight to f6 check, a clearance sacrifice that opens up the bishop on b3 and forces black to capture back with the g pawn. After the knight is taken, white simply has bishop takes f7 checkmate as it is defended by the e5 knight, which also covers the d7 square, utilizing the newfound activity of the light squared bishop.
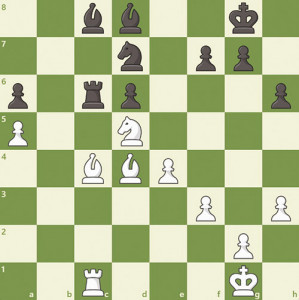
Figure 2 is a position from a game between International Master Gustavo Mahia with the white pieces and Grandmaster Miguel Quinteros with black at the Los Polvorines Open of 1980. From this point in the match, Mahia executed very sharp, tactical play to launch a devastating attack against the black king at the cost of much material. White began with 1. fxg2, encroaching on th black king’s safety but sacrificing the knight on d4 to 1… Rxd4, after which the rook cannot be captured by the queen because of Bc5, pinning the queen to the king. Instead white played 2. Qh6 to prepare an attack against the black king and defending the pawn on g7; if black captures the seemingly free knight on c3, white then has the crushing sacrifice Rxf7 Kxf7 Qxh7 and black cannot prevent white from promoting the g pawn to a Queen without the major loss of material. Therefore black played 2… Qe5 but here white has the brilliant clearance sacrifice 3. Ne4, giving up the knight to prepare to mobilize the rook on b3. 3… Qxe4 4. Bh5 Rd7 5. Rd3, aiming to remove the d7 rook from its defense of f7. To prevent this, Quinteros played 5… Bc5+ 6. Kh1 Bd4, cutting off the connection between the two rooks and hitting g7. 7. Rg3 8. Nc6 and Mahia once again utilized the idea of the clearance sacrifice and played the winning move 9. Bg6, threatening Qxh7. If either pawn takes it, the newly open file allows a backrank checkmate with either Qh8# or Rf8#, forcing 9… Qxg6 10. Rxg6 Ne7. Not finished sacrificing material, Mahia spots the checkmate in 6 that ensues after 11. Rxf7 Kxf7 12. g8=Q+ Nxg8 13. Qxh7+. Here black resigned as checkmate is unstoppable after 13… Bg7 14. Qxg7+ Ke8 15. Qxg8+ Rxe6#.
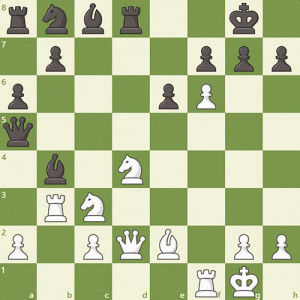
Figure 3 is a slightly modified position from a game between Manfred Tauber and Peter Bachmayr in 1991 in which material is equal but white has his pieces lined up nicely against black’s king. Here, the only move that wins the game for white is the clearance sacrifice rook to c7, allowing the rook to be captured two ways but both lose for black. If the knight takes then the white queen captures the black queen on d7 and if the queen takes on c7, white has the incredible move queen to h6, forcing checkmate in four moves. The queen cannot be captured because knight takes h6 is checkmate and, otherwise, queen to g7 checkmate is unstoppable. After rook to c7, if black plays queen to d8, preventing the queen to h6 checkmating pattern by preparing bishop to f6, bishop takes f6 and queen takes f6 and moving out of the rooks attack, white has knight takes on e7. After black takes back on e7 with his knight, white plays queen to c3, threatening checkmate on g7 and opening a discovered attack from the rook on d1 to black’s queen on d8.
The position shown in Figure 4 is from a game between grandmasters Ivan Cheparinov and Zoltan Almasi at the Corus Group B in 2006. The winning move for white is the clearance sacrifice knight to e7 check, and after the bishop takes on e7, white plays bishop takes f7 check, sacrificing a second minor piece in a discovered attack to win black’s rook. While trading a two minor pieces for a rook is generally a worse exchange, the crux of the tactic is that after the black king takes on f7 and the white rook takes c6, black cannot prevent the loss of a minor piece as the light squared bishop is under attack from the rook. If it goes to b7, the only square to which it can escape, white has rook to c7 which forks the bishop and the knight on d7, leaving white ultimately up a minor piece.
Ethan Feder is a junior at Yeshivat Frisch, a chess enthusiast and player. The goal of his column is to teach and discuss chess concepts through example positions, high-level games and relevant puzzles, along with explanations. Feel free to contact him with any questions, suggestions or comments at [email protected].
