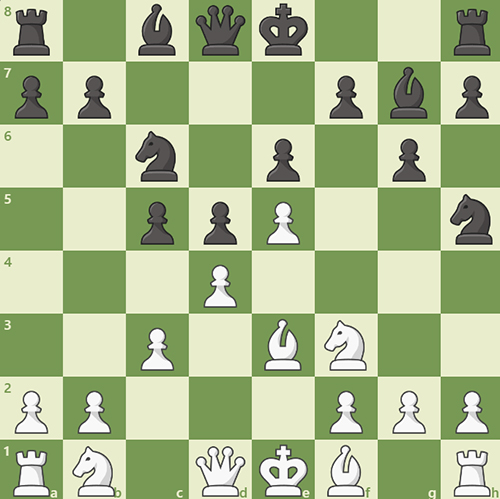
In chess, a trapped piece is one that has no safe escape squares to which it can move without being captured. The idea can be a powerful tool to constrain the activity of the opposing pieces but can also be used to cage them and render them helpless to a simple attacking move. This motif is demonstrated in Figure 1 in which material is equal and both sides have begun developing their pieces and taking central space. However, black’s knight on h5 is noticeably stranded on the edge of the board without any squares to move to. If given an additional move, black would be able to save the knight with a move like pawn to f5. Therefore, the winning move for white is to strike quickly with pawn to g4, hitting knight on h5, which cannot escape the attack. White is guaranteed to capture the knight, securing a completely winning advantage.
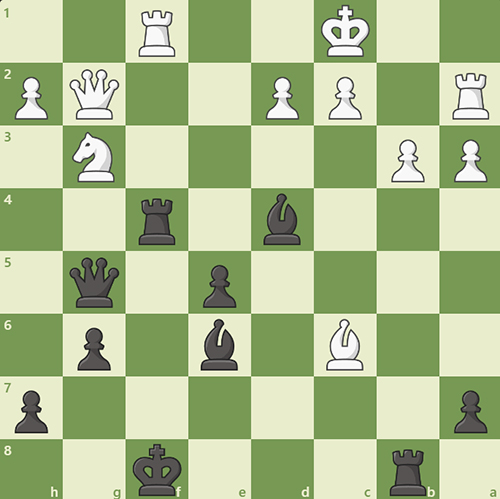
The position shown in Figure 2 is from a game played in 1927 in London between the two incredibly strong chess players of the 20th century, Aron Nimzowitsch with white and William Winter with black. Nimzowitsch is up a pawn but Winter has a slight advantage due to the highly active nature of black’s pieces with the rooks, queen and bishops all pressuring the white position, while white’s pieces are less organized and without targets. Winter began with 1… Kg7, moving the king out of the f file to a safer, more sheltered home. White continued with 2. Rxf4 exf4 3. Ne2 Qxg2 4. Bxg2, first trading off the hanging queen before extricating the dark squared bishop from the knight’s attack and defending the f4 pawn with 4… Be5. 5. d4 Bc7 6. d5, a slight overreach on white’s part that only serves to facilitate the activation of black’s bishop with 6… Bg4, hitting the e2 knight and preparing to push the f4 pawn to f3. 7. Nd4 Bb6 8. Ne6 Kf6 9. Kd2 Be3+ and the strength of black’s position becomes extremely clear.

Winter has two powerful bishops patrolling the opposing side of the board in the escort of the f pawn and an active rook staring down the semi-open b file. Nimzowitsch on the other hand is left with a practically useless rook secluded on h2, a knight on e6 anchored in only by the weak d5 pawn and a meager bishop on g2 susceptible to the threat of f3 in many lines. White immediately succumbed to the pressure and blundered with 10. Ke1, allowing 10… f3 and forcing 11. Bh1 to preserve the bishop (11. Bf1 allows 11… f2# mate in one), completely trapping the bishop. However, the bishop is not white’s only hemmed in piece; the knight e6 knight is left stranded in black’s side of the board with no route of escape. 11… Rb5 is the critical move, undermining d5 pawn, and after 12. Nc7 Rc5 13. Ne8+ Ke7, the bishop is left trapped on the edge of the board. Therefore, Nimzowitsch resigned following the loss of his knight with 14. c4 Kxe8.
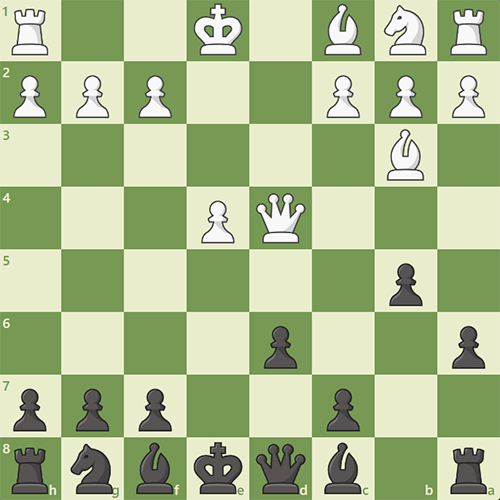
Figure 3 is from a game from 1929 in Budapest between Hungarian chess player Endre Steiner with the white pieces and former World Chess Champion Jos? Capablanca with the black pieces. From the onset, White’s queen and bishop may appear to be assets, active and seemingly well positioned in the center of the board. However, this placement leaves them susceptible to counterstrikes and, thus, the winning move for black is pawn to c5, launching the pawn forward with tempo. Steiner moved his queen to d5, attacking the rook on a8 so Capablanca could not immediately win the b3 bishop with pawn to c4. Capablanca continued with bishop to e6, hitting the white queen while opening up his queen to defend the rook. Steiner continued with queen to c6 check, but after bishop to d7, blocking the check with a counterattack, white is forced to move the queen out of the way and black is finally able to trap the bishop with pawn to c4. Having won the bishop, Capablanca went on to ultimately win the game.

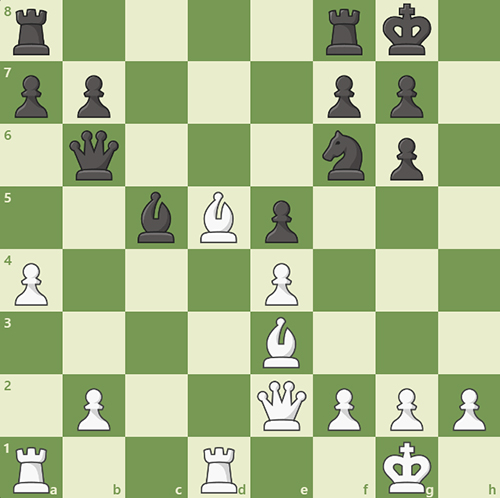
The position exhibited in Figure 4 is from a game between International Master Simon Knott with white and David Adams with black from the 2004 British Championship. The key idea in this position is an amalgam of removing the defender, discovering attack and trapping pieces, taking advantage of fragility of the black queen’s defense of the c5 bishop. The winning move is pawn to a5, hitting the black queen, which is left with no safe squares to escape to while simultaneously defending the bishop. Queen to d6 fails to bishop, takes b7, winning the rook with a discovered attack, and queen to c7 loses to either rook to c1, pinning and attacking the bishop, which cannot be defended. This leaves the most viable and accurate option of queen to b4. This idea fails due to the trapping of black’s queen, beginning with the move bishop to d2. The queen is forced further into white’s position with queen takes b2 and rook d to b1 hits queen, leaving it without any safe squares to go to. Queen to d4 loses to bishop to e3, queen to c3 and rook to c1. Queen to c2 which was played in the game loses to rook to c1, queen to b2 and rook to a2, and the queen is trapped and helpless in the depths of the white side of the board. With the game beyond salvation, it was in this position that Adams resigned the game.

Ethan Feder is a senior at Yeshivat Frisch, a chess enthusiast, instructor and player. The goal of his column is to teach and discuss chess concepts through example positions, high-level games and relevant puzzles, along with explanations. Feel free to contact him with any questions, suggestions or comments at ethan.feder@gmail.com.


