The primary goal in chess is, of course, to win the game. However, when winning is no longer possible, rather than simply accepting defeat, one should always be on the lookout for ways to force a draw and tie the game. Chess games conclude in a draw after stalemate when a player has no legal moves, threefold repetition of the same position, mutual agreement, insufficient checkmating material and if no pawn moves or captures are made within 50 moves. The first two methods, stalemate and repetition can be forced onto your opponent, allowing a player to secure a draw in a possibly lost position. This concept is demonstrated in Figure 1 in which black has a crushing material advantage and is on the verge of checkmating the white king. Yet white can prevent a loss by forcing a draw through threefold repetition by repeatedly checking the black king in an inescapable loop. This is done with queen to h6 check, and after the king goes to g8, white continues the checks with queen to g6. This forces the king back to h8 and the position has returned to its original state so after white repeats this checking sequence twice more, the game simply concludes in a draw.
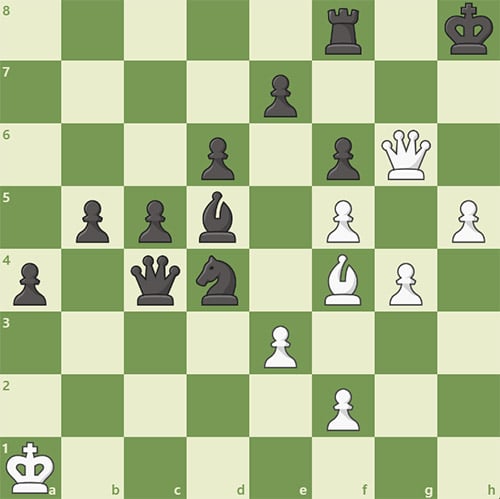
Figure 2 is a position from a game between Jaume Mora Corbera with white and Grandmaster Duncan Suttles with black from the 1964 Tel Aviv Olympiad that features a brilliant sacrifice to draw an otherwise worse position. The game began with a sideline of the Modern Defense: 1. e4 g6 2. h4, immediately taking space and preparing a future attack on the black kingside. 2… Bg7 3. Nc3 Nc6 4. h5, striking at the black kingside and preventing Nf6 with the threat of pushing the h pawn to h6 to force the bishop back to f8. The players continued to develop regularly with 4… d6 5. Bc4 Nd4 6. d3 Nh6 and white attained a slight edge until 7. Bxh6 Bxh6, an inaccuracy that gives up white’s superior dark squared bishop for the black knight. 8. Nge2 Bg4 9. hxg6 hxg6, another inaccuracy by white who should have played f3, attacking the g4 bishop and unpinning the e2 knight so it can capture the black knight on d4. And the mistakes by white continued with 10. Qc1, a flashy queen sacrifice that intends (10… Bxc1 11. Rxh8+ Kd7 12. Rxd8 Rxd8 13. Rxc1), culminating in a position in which white is winning, up a knight. However, black is not obliged to capture the queen and instead simply played 10… Bh5, threatening Bxc1 by preventing Rxh8 afterwards. 11. f4 e5 12. Nxd4 and black found the powerful in-between move 12… Bxf4, attacking the queen before recapturing the knight on d4. Here, we reach the position shown in Figure 2 and white found the incredible move 13. 0-0, giving up the queen once more and castling kingside to open up the rook on the f file. This is because after Suttles captured the queen with 13… Bxc1, white is able to force a draw by repetition with 14. Bxf7+. The king cannot run to f8 because of Ne6, forking the king and queen with an advantage for white. If the king goes to d7, white cna force a threefold repetition with (15. Be6+ Ke8 16. Bf7+ Kd7) and if the king goes to e7, white has Nd5+, pushing the king back to d7 which allows the above perpetual check.
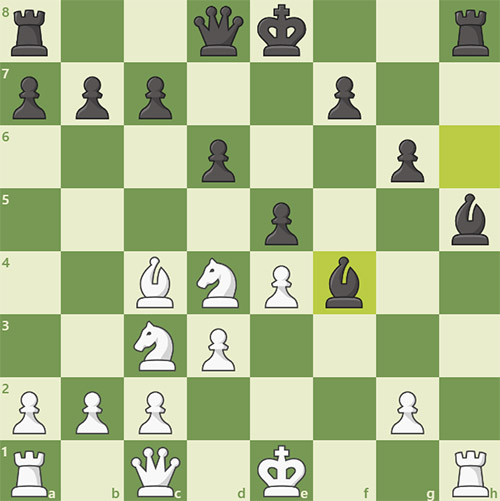
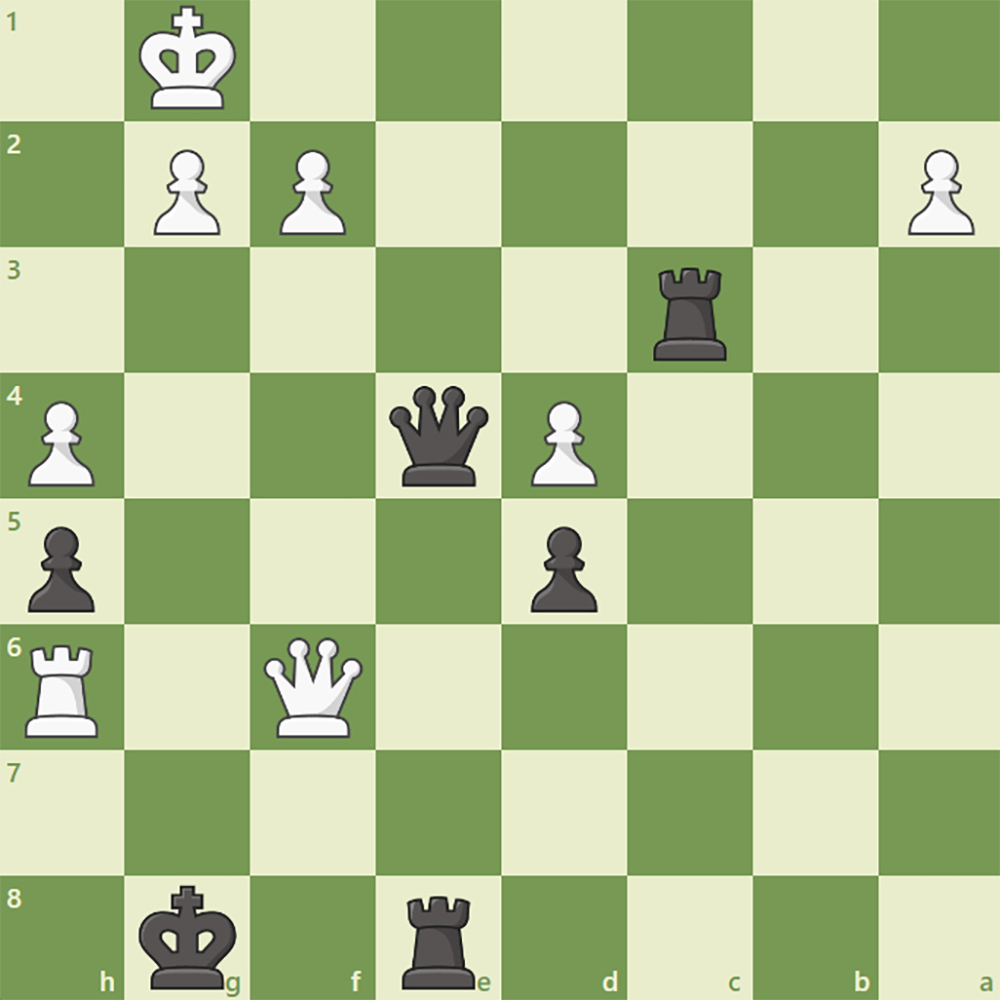
Figure 3 is a position from a game between Grandmasters Alfonso Romero Holmes with white and Boris Kantsler with black from the 2002 European Club Cup. white is on the verge of checkmating black, threatening to play Rook to h8 checkmate on the next move. However, black is able to prevent a loss by drawing the game through a forced stalemate as the king and both pawns cannot legally. The drawing idea begins with the move queen to e1 check. The king is forced to h2 and white continues weaving the stalemate by sacrificing the queen on h1. The king has to capture and black continues disposing his pieces with rook to e1 check, king to h2 and rook to h1, forcing the king to capture. Lastly, black gets rid of his last mobile piece with rook to h3 so that after the king moves to g1, black has rook to h1 check and the white king has to capture a third time. Because black no longer has any legal moves in the position, the game concludes in a stalemate draw.
The position shown in Figure 4 is from a 1996 game between Grandmaster David Bronstein with white and the chess computer Deep Blue with black. White is down a pawn and a rook for a bishop in an almost completely losing position yet Bronstein found the brilliant technique to draw the position beginning with the move queen to c5 check, giving up the knight on b7. This is because after king takes b7, white has queen to b5 check and black is unable to escape an infinite loop of checks. The game concluded with 2… Kc8 3. Qc6+ Kd8 4. Qd6+ Bd7 5. Qb8+ Bc8 6. Qd6+ Bd7 7. Qb8+ Bc8 8. Qd6+ and Bronstein successfully fended off the machine, forcing a draw by threefold repetition.

Ethan Feder is a senior at Yeshivat Frisch, a chess enthusiast, instructor and player. The goal of his column is to teach and discuss chess concepts through example positions, high-level games and relevant puzzles, along with explanations. Feel free to contact him with any questions, suggestions or comments at [email protected].